Monday, November 21, 2011

Rigging: Woman

Video tutorials from  http://www.swinburne.edu.au/design/tutorials/P-maya/T-Maya-Rigging-Rigging-a-biped-character-for-animation/ID-125/

This is the first full detailed human body rigging i have ever done and WOW! I have got to say i have this new found respect for riggers! It was a lot hard work and patience! What i have experienced here is that rigging steps does not always go the way you would imagine it'll go. Like getting the local rotational axis to all go in the same direction.

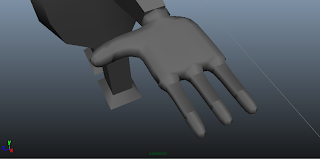
This was the part, i felt myself (i know its a little dramatic but its 19 video tutorials) dying a little inside each time it did not work no matter in which direction i orientated the axis to go( believe me i tried every single combination). The right hand was the one giving me so much problems because it did not cooperate and jerked out of the model each time i did anything at all to the joints (even parenting). I can't count how many times i re-arranged it.


Anyway, back to the local rotational axis, you may think like, "hey its okay if it doesn't work. The guy in the tutorial said that it was your choice to do it or not anyway." But NO! I need to point out here how much work you're saving yourself later if you get the axis right at first because when you get to the "set Driven Key Stage" and pair up the "rotate" function from driver to driven, you only have to rotate one direction (X, Y or Z) but if you notice in my screenshot below, my axis are pointed down diagonally and i couldn't just rotate it in one direction because it'll not appear human at all. I had to rotate function in 2 or even 3 directions to get the correct 90 degrees movement. Like this,
    
Also, for the thumb its a bit tricky because it wasn't included in the video tutorial and you have to consider how the thumb should go like instead of up and down, it faces the side. So you can't blindly do the same thing for each finger.

Here's the full body screenshot of my rig,
     

Side view (better spine to head controller view),


the legs (better foot to knees controller view),


the hand (better hand controller view),


At one point before the smooth skin binding we had to do another step first which was to create an IK Spline Handle to give some "stretchiness" to the spine. The interesting part here was the MEL Command. Its my first time knowing what it does. Its basically for codes to create a boolean to return arclength of a curve. The code is : arclen -ch on BindSpineSIKCurve;  (we named our curve BindSpineSIKCurve before that)  and this step is to add stretch to the chain which i have learnt from pages from this book,

Unfortunately, i can't paste the book details here because that would be copyrighting but its a good book to help you understand more about the MEL Command and rigging. So check out this book if you want to learn more.

Extra details
-ch stands for construction history http://autodesk.com/us/maya/2011help/Commands/arclen.html
Next is the linking of  to the multiplydivide node. One silly mistake i made, was spending so much time trying to find the "input1.inputX" because i was trying to link the arclength of the curveinfo to it. And arclength appeared when i right-clicked the curveinfo node but only output appeared for mulitplydivide.  Finally, through experimenting, it actually appears naturally when you hover your link thread from the arc length over it. Its embarrassing really! Hope you guys don't make the same mistake! Here's a webpage for you to better understand the inputs and outputs of the multiplydivide nodefile:///C:/Program%20Files/Autodesk/Maya2011/docs/Maya2011/en_US/Nodes/multiplyDivide.html

Rigging has a lot of steps so start from the first step which is the pelvis  because its the center and make your way up:) Good Luck!

Cow Body

This is a sequel to the cow head modelling i did previously. So the cow has a body right now and here it is.


To me this was more challenging but also fun at the same time because we could only follow the instructions given from slides and not a video tutorial to guide us in every step of the way so it was more freestyle. What i mean by that is i had to follow my own instinct and figure out how i could shape and sculpt the model.

This is a side view of my cow.

I made a mistake on my first attempt because the instructions had a typo error and it said, "subdivision height and width, 3 and subdivision depth 4." So what happened was when i got to the stage where i had to pull the belly out, i did not have enough subdivisions and the best belly i could made out of it was one that sunk really low and it did not suit my cow at all because i was thinking its more of a "baby belly" instead of an "old man belly". That's when i realised, the subdivision depth was supposed to be 5. It made me learn how important the right amount of subdivision is.

This are the legs of my cow and one difficulty i had here was when i extruded the legs at first, i moved the extrude tool all the way down instead of extruding many times to create the subdivision for the legs. The slides just noted, "Remember to leave details on the legs."

So it left me stuck at this point, googling again and again on how to create subdivisions on my extruded smooth surface. And i found this website, http://caad.arch.ethz.ch/info/maya/manual/UserGuide/ModelingPoly/PolySplitSubdiv.fm.html#997663
Its really quite helpful with Maya problems. Very clear instructions. I go back to it with my other problems too.

So it was extra work but i managed to learn how to make use of the "Add Divisions" and insert edge loop tool" (of course, deleting any unnecessary edges to tidy up) right here.

And here's the close up of the hand which needed to me trust my instincts on moving around the vertexes to not make it look so blocky. This is it for my cow, i hope you manage to learn from my mistakes and its helpful to you:)

Saturday, November 12, 2011

Posing: 11SecClub Rig!

Our lecturer had us experimenting with this rig from http://www.11secondclub.com/

One important thing i have figured out and would like to point out is, if you want to use the rig. You have to open the maya file given called, workspace and then drag in, 'ElevenRig_RC1', from the Scenes file. To achieve the correct texture which is supposed to look like this.


If the 'ElevenRig_RC1' file is dragged into a new maya scene created by yourself, it will give you this ghoulish kind of texture.

   
And that IS NOT THE ONLY PROBLEM because if you decide to stick with it and render it after all that hard work, it will only look black like this. You can't even change the environment color. So please make this step before working on your rig.


 So back to the work, we're supposed give them 3 poses and here are the pictures we've gotten from the internet.

I'm calling this one the '300',

This one the 'Tattoo Girl',

And finally, this one, the 'Bollywood Girl'.

And this is what i came up with. For 300, i did this one first and it took quite some time because the arms on the rig felt too long compared to the small body it had so i had to angle it more towards the back. Overall, i like the pained facial and body expressions. Here are renders of it.


This is a Full Body.

This is a close up. 

Now for the Tattoo Girl,  there was also a bit of trouble with the hands but i managed to get her into the pose. The tricky about this one is you have to do the pose yourself to realize that she isn't exactly leaning forward even though her right arm looks as if its supporting her weight. Also, her facial expression looks like she couldn't care less when her body is in such a complicated pose.


This is the full body.

This is a close up.


Finally, the Bollywood Girl. Her pose is also interesting because she's very relaxed but not to the point whereby she slouches all over the chair. She still manages to keep her classy look by keeping her back straight. I made a slightly-curved back chair here for her to make it look more relevant.


Tuesday, November 1, 2011

Posing: Spidey:)


We've moved on to doing posing right now, using an awesome spiderman rig for our first practice. I found out today that there are a lot of things to consider before you do posing. Like the "lines" to make an expression with the body, for example, the C shape for actions like a character being pushed back or inverted C to be menacing or heroic and many more like S or | and etc. Good to remember that it is mainly about the spine.

Other important points to take note of is the weight of the body when the character does a pose so that it doesn't look stiff and a slight twist in the body posture can actually bring more "tension" and live to a character.

So here are shots renders for my spidey. Notice i twisted the spine a little towards his right so he looks like he is resting his weight and the knees are pointed downwards to balance his weight so that it looks more natural. I'm really quite happy with it except for the part where i did not keep his hip control horizontal but rotated which i found out after from my lecturer that i could cause problems if i start animating. All and all, i'm happy with the pose now so i hope you feel the same way about it:)

                                                                        Front view

                                                                         Back view
                                                                         
                                                                          Side View

                                                       Interesting perspective: I kind of
                                                       played around and got this shot which i find
                                                       pretty interesting like it could be used for a
                                                       part of a movie scene.